vLLM 스터디 1회차 — 도입부 & Engine 진입
🤖 이 글은 Claude Opus 4.7이 정리·작성했습니다.
원문(영문) 한 줄씩 번역·해석하고, 현재 vllm-project/vllm main 코드와 매핑하는 방식으로 구성했습니다. 사람이 다시 검토했지만, 코드 위치와 라인 번호는 시점에 따라 어긋날 수 있습니다.
새로운 스터디를 시작했다. Aleksa Gordic의 Inside vLLM: Anatomy of a High-Throughput LLM Inference System을 돌아가면서 발표하는데, 단순 발표가 아니라 현재 vLLM 코드베이스까지 같이 따라가면서 보기로 했다.
- 원문 commit:
42172ad(2025-08-09)- 현재 분석한 vllm main:
c0879d948— 약 8개월 더 진행됨- 따라서 파일 위치 / 함수명이 옮겨진 부분은 따로 짚어준다
링크는 모두 vllm-project/vllm upstream main 기준이다.
1. 제목 & 부제
Inside vLLM: Anatomy of a High-Throughput LLM Inference System
From paged attention, continuous batching, prefix caching, specdec, etc. to multi-GPU, multi-node dynamic serving at scale
번역하면 — vLLM 내부: 고처리량 LLM 추론 시스템 해부 / paged attention, continuous batching, prefix caching, 추측 디코딩(specdec)부터 멀티 GPU·멀티 노드 동적 서빙까지.
핵심 키워드는 High-Throughput. vLLM은 “단일 요청 latency”가 아니라 동시에 많은 요청을 GPU에 꾹꾹 채워 넣어 throughput을 끌어올리는 것이 목표인 시스템이다. 부제에 등장한 5개 키워드(paged attention / continuous batching / prefix caching / specdec / multi-GPU·node serving)가 사실상 앞으로의 스터디 목차다.
2. 글의 구성 — 역피라미드(inverse-pyramid)
This post is the first in a series. It starts broad and then layers in detail (following an inverse-pyramid approach) so you can form an accurate high-level mental model of the complete system without drowning in minutiae.
처음엔 넓게 시작해서 점점 디테일을 쌓아가는 역피라미드 방식. 사소한 디테일에 빠지지 않고 전체 시스템의 고수준 mental model을 갖게 하는 것이 목표.
스터디 진행에도 그대로 적용한다 — “왜 이 컴포넌트가 필요한가 → 어떻게 동작하는가 → 코드 어디에 있는가” 순서. 처음부터 PagedAttention CUDA 커널부터 보면 청중을 잃는다.
3. 시리즈 5파트 + 코드 매핑
블로그 시리즈는 5개 파트로 구성된다.
- LLM engine & engine core — scheduling, paged attention, continuous batching 등 fundamentals
- Advanced features — chunked prefill, prefix caching, guided & speculative decoding, disaggregated P/D
- Scaling up — single-GPU → multi-GPU
- Serving layer — distributed / concurrent web scaffolding
- Benchmarks and auto-tuning — latency / throughput 측정
각 파트가 현재 vllm 레포의 어디에 매핑되는지 정리:
| 블로그 파트 | vllm 디렉토리 / 핵심 파일 |
|---|---|
| ① Engine & Engine Core | vllm/v1/engine/, vllm/v1/core/, vllm/v1/core/sched/ |
| ② Advanced features | vllm/v1/attention/ (paged attention) vllm/v1/core/kv_cache_manager.py (prefix caching) vllm/v1/spec_decode/ (speculative decoding) vllm/v1/structured_output/ (guided decoding) |
| ③ Scaling up | vllm/v1/executor/ vllm/v1/worker/ vllm/distributed/ |
| ④ Serving layer | vllm/entrypoints/api_server.py vllm/entrypoints/openai/ |
| ⑤ Benchmarks | benchmarks/ vllm/benchmarks/ |
4. 분석 기준
Analysis is based on commit
42172ad(August 9th, 2025).
Target audience: anyone curious about how state-of-the-art LLM engines work, as well as those interested in contributing to vLLM, SGLang, etc.
I’ll focus on the V1 engine. I also explored V0 (now deprecated)…
타겟 청중은 state-of-the-art LLM 엔진의 동작이 궁금하거나, vLLM/SGLang 같은 프로젝트에 기여하고 싶은 사람. V1 엔진에만 집중한다. V0는 이미 deprecated.
⚠️ 우리 레포 main은 블로그보다 약 8개월 더 진행됐기 때문에 파일이 옮겨지거나 함수명이 바뀐 부분이 있다. 차이가 보일 때마다 “blog 시점 vs 현재” 로 짚어주면 청중 관점에서 가치가 크다.
5. 실행 예제 — offline 추론 6줄
from vllm import LLM, SamplingParams

prompts = [
    "Hello, my name is",
    "The president of the United States is",
]

sampling_params = SamplingParams(temperature=0.8, top_p=0.95)

def main():
    llm = LLM(model="TinyLlama/TinyLlama-1.1B-Chat-v1.0")
    outputs = llm.generate(prompts, sampling_params)

if __name__ == "__main__":
    main()
📂 현재 레포 실제 파일: examples/basic/offline_inference/basic.py
(블로그에선 단순히 basic.py라 적혀있지만 현재는 경로가 정리됐고, 모델도 OPT-125m으로 바뀌어 있다.)
이 짧은 코드가 앞으로 수십 페이지 분석의 러닝 예제가 된다. 모든 컴포넌트는 LLM(...) 생성자 안에서 만들어지고, llm.generate(...) 한 번 호출로 동작한다.
6. 환경 변수 — V1 / 단일 프로세스 모드
# Engine V1 사용 (현재 main에선 default)
VLLM_USE_V1="1"

# EngineCore 멀티프로세싱을 끔 → 한 프로세스 안에서 sync 실행
VLLM_ENABLE_V1_MULTIPROCESSING="0"
VLLM_ENABLE_V1_MULTIPROCESSING=0이면 EngineCore가 별도 프로세스가 아니라 호출자와 같은 프로세스에서 돌게 된다. 디버거로 step-through하면서 흐름을 따라가기 좋다.
이 변수는 코드 경로를 분기시킨다. 끄면 InprocClient, 켜면 SyncMPClient / AsyncMPClient 가 사용된다 (vllm/v1/engine/core_client.py의 EngineCoreClient.make_client()).
# core_client.py 요약
class EngineCoreClient(ABC):
    @staticmethod
    def make_client(multiprocess_mode, asyncio_mode, ...):
        # multiprocess_mode == False  → InprocClient  (학습용)
        # multiprocess_mode == True   → Sync/AsyncMPClient  (운영용)
        ...

class InprocClient(EngineCoreClient):       # 같은 프로세스
    def __init__(self, *args, **kwargs):
        self.engine_core = EngineCore(*args, **kwargs)  # 직접 생성

class MPClient(EngineCoreClient):           # 별도 프로세스 + ZMQ IPC
    ...
class SyncMPClient(MPClient): ...
class AsyncMPClient(MPClient): ...
모든
VLLM_*환경변수 정의는 vllm/envs.py에 모여 있다.
7. 분석 시작 시 가정 — 단순화 사다리
This configuration is:
- offline (no web/distributed system scaffolding)
- synchronous (single blocking process)
- single-GPU (DP/TP/PP/EP = 1)
- standard transformer (no hybrid models like Jamba)
4가지 단순화 가정에서 출발해서, 한 단계씩 풀어가며 vLLM 전체로 확장하는 게 시리즈 전체의 진행 방식이다.
| 가정 | 풀리는 시점 (블로그 파트) | 관련 코드 |
|---|---|---|
| offline (웹 X) | Part 4 (Serving layer) | vllm/entrypoints/openai/ |
| synchronous | Part 1 끝 ~ Part 3 | vllm/v1/engine/async_llm.py vllm/v1/engine/core_client.py (Async 계열) |
| single-GPU (DP/TP/PP/EP = 1) | Part 3 (Scaling up) | vllm/distributed/ vllm/v1/executor/ |
| standard transformer (no hybrid) | (시리즈 후속편) | vllm/v1/core/kv_cache_coordinator.py vllm/v1/core/single_type_kv_cache_manager.py |
8. “두 가지 일” — Constructor & generate
In this example we do two things, we:
- Instantiate an engine
- Call generate on it to sample from the given prompts
Let’s start analyzing the constructor.
이제 본격적으로 코드로 들어간다.
🔬 코드 들여다보기: LLM.__init__ 첫 진입
① LLM.__init__ 시그니처가 알려주는 것
파일: vllm/entrypoints/llm.py — 클래스 LLM, __init__ 시작은 라인 212.
def __init__(
    self,
    model: str,
    *,
    runner: RunnerOption = "auto",
    tokenizer: str | None = None,
    tokenizer_mode: TokenizerMode | str = "auto",
    skip_tokenizer_init: bool = False,
    trust_remote_code: bool = False,
    # ... 분량 많음 ...
    tensor_parallel_size: int = 1,
    dtype: ModelDType = "auto",
    quantization: QuantizationMethods | None = None,
    seed: int = 0,
    gpu_memory_utilization: float = 0.92,
    cpu_offload_gb: float = 0,
    enforce_eager: bool = False,
    disable_custom_all_reduce: bool = False,
    # ...
    compilation_config: int | dict[str, Any] | CompilationConfig | None = None,
    logits_processors: list[str | type[LogitsProcessor]] | None = None,
    **kwargs: Any,
) -> None:
읽는 법:
tensor_parallel_size=1,gpu_memory_utilization=0.92같은 default → “단일 GPU + GPU 메모리의 92%를 vLLM에 쓴다” 가 디폴트enforce_eager=False→ 기본은 CUDA Graph 캡처 사용. 디버깅할 땐 보통enforce_eager=True로 켠다compilation_config는 int / dict / CompilationConfig 객체 모두 받음 → 단계적 진화 흔적**kwargs로 EngineArgs의 거의 모든 필드를 그대로 흘려보냄 → “사용자 친화적 LLM 클래스”는 사실상 EngineArgs 빌더의 얇은 wrapper
② Body — Config로 변환되어 EngineArgs로
# vllm/entrypoints/llm.py:340 부근
engine_args = EngineArgs(
    model=model,
    runner=runner,
    tokenizer=tokenizer,
    tensor_parallel_size=tensor_parallel_size,
    gpu_memory_utilization=gpu_memory_utilization,
    enforce_eager=enforce_eager,
    compilation_config=compilation_config_instance,
    # ... 위에서 받은 인자 거의 전부 ...
    **kwargs,
)

log_non_default_args(engine_args)

# 핵심: 진짜 엔진은 LLMEngine 가 만든다
self.llm_engine = LLMEngine.from_engine_args(
    engine_args=engine_args,
    usage_context=UsageContext.LLM_CLASS,
)
💡
LLM클래스는 사용자 입력을 받아EngineArgs로 묶고,LLMEngine.from_engine_args를 호출하는 게 전부. 실제 엔진 본체는LLMEngine이며 그 자식이EngineCore.
③ LLMEngine.from_engine_args — config 만들고 LLMEngine 생성
파일: vllm/v1/engine/llm_engine.py — from_engine_args @ 라인 152.
@classmethod
def from_engine_args(
    cls, engine_args: EngineArgs,
    usage_context: UsageContext = UsageContext.ENGINE_CONTEXT,
    stat_loggers: list[StatLoggerFactory] | None = None,
    enable_multiprocessing: bool = False,
) -> "LLMEngine":
    # 1) EngineArgs → VllmConfig 로 정규화
    vllm_config = engine_args.create_engine_config(usage_context)

    # 2) Executor 클래스 결정 (single GPU vs Ray vs MP)
    executor_class = Executor.get_class(vllm_config)

    # 3) 환경변수 보고 multiprocessing 토글
    if envs.VLLM_ENABLE_V1_MULTIPROCESSING:
        enable_multiprocessing = True

    return cls(
        vllm_config=vllm_config,
        executor_class=executor_class,
        log_stats=not engine_args.disable_log_stats,
        usage_context=usage_context,
        stat_loggers=stat_loggers,
        multiprocess_mode=enable_multiprocessing,
    )
- VllmConfig: 모든 하위 config(model, parallel, scheduler, cache, …)의 통합 컨테이너. 앞으로 vLLM 전체에서 가장 많이 보게 될 객체
- Executor.get_class(): GPU 한 장이면
UniProcExecutor, 여러 장이면MultiprocExecutor/RayDistributedExecutor등으로 분기. vllm/v1/executor/ 참고 - multiprocess_mode: 위에서 본 InprocClient ↔ MPClient 분기 스위치
④ LLMEngine.__init__ — 엔진의 골격
파일: vllm/v1/engine/llm_engine.py — __init__ 시작 라인 50.
def __init__(self, vllm_config, executor_class, log_stats, ...):
    self.vllm_config   = vllm_config
    self.model_config  = vllm_config.model_config
    self.observability_config = vllm_config.observability_config

    # renderer: prompt → token 시퀀스 변환 (chat template, tokenizer 적용)
    self.renderer = renderer = renderer_from_config(self.vllm_config)

    # input_processor: EngineInput → EngineCoreRequest 변환
    self.input_processor = InputProcessor(self.vllm_config, renderer)

    # output_processor: EngineCoreOutputs → RequestOutput 으로 풀어줌 (detokenize 등)
    self.output_processor = OutputProcessor(
        renderer.tokenizer,
        log_stats=self.log_stats,
        stream_interval=self.vllm_config.scheduler_config.stream_interval,
        tracing_enabled=tracing_endpoint is not None,
    )

    # 핵심: EngineCore 클라이언트 — Inproc 또는 MPClient
    self.engine_core = EngineCoreClient.make_client(
        multiprocess_mode=multiprocess_mode,
        asyncio_mode=False,
        vllm_config=vllm_config,
        executor_class=executor_class,
        log_stats=self.log_stats,
    )
🧱 LLMEngine의 4대 컴포넌트
- renderer — prompt → token (chat template/tokenizer 적용)
- input_processor — EngineInput →
EngineCoreRequest - engine_core (Client) — 실제 추론 루프 보유. Inproc/MP 두 종류
- output_processor —
EngineCoreOutputs→RequestOutput(detokenize 등)
데이터 흐름:
prompt → renderer → input_processor → engine_core → output_processor → RequestOutput
⑤ LLMEngine.step — 한 사이클의 전부
파일: vllm/v1/engine/llm_engine.py — step @ 라인 287.
def step(self) -> list[RequestOutput | PoolingRequestOutput]:
    # 1) EngineCore 한 번 돌리고 결과 받아오기
    outputs = self.engine_core.get_output()

    # 2) detokenize 등 후처리
    processed_outputs = self.output_processor.process_outputs(
        outputs.outputs,
        engine_core_timestamp=outputs.timestamp,
        iteration_stats=iteration_stats,
    )
    self.output_processor.update_scheduler_stats(outputs.scheduler_stats)

    # 3) stop string 등으로 끝난 요청 abort
    self.engine_core.abort_requests(processed_outputs.reqs_to_abort)

    # 4) stats 기록
    # ...

    return processed_outputs.request_outputs
이 4단계가 vLLM의 한 “iteration” 이고, 이게 반복돼서 모든 요청이 끝날 때까지 돌아간다. llm.generate()는 결국 has_unfinished_requests() 동안 step()을 반복 호출하는 루프다.
⑥ EngineCore — 진짜 추론 루프의 본체
파일: vllm/v1/engine/core.py — 클래스 EngineCore @ 라인 91.
class EngineCore:
    """Inner loop of vLLM's Engine."""

    def __init__(self, vllm_config, executor_class, log_stats, ...):
        # 1) 모델 실행기 — 워커들에게 모델/메모리/배치 분배
        self.model_executor = executor_class(vllm_config)

        # 2) KV cache 메모리 측정 + 페이지 단위 블록 풀 구성
        kv_cache_config = self._initialize_kv_caches(vllm_config)

        # 3) 스케줄러 — Continuous batching의 심장
        Scheduler = vllm_config.scheduler_config.get_scheduler_cls()
        self.scheduler = Scheduler(
            vllm_config=vllm_config,
            kv_cache_config=kv_cache_config,
            structured_output_manager=self.structured_output_manager,
            ...
        )

        # 4) (옵션) speculative decoding
        self.use_spec_decode = vllm_config.speculative_config is not None

        # 5) (옵션) prefix caching 용 hash 함수 셋업
        if vllm_config.cache_config.enable_prefix_caching or kv_connector is not None:
            ...
            self.request_block_hasher = get_request_block_hasher(...)

        # 6) step 함수 결정 (PP 켜져 있으면 batch_queue 버전)
        self.step_fn = (
            self.step if self.batch_queue is None
            else self.step_with_batch_queue
        )
🎯 여기서 보이는 것: 블로그 시리즈의 다음 키워드들이 EngineCore.__init__에 그대로 박혀있다.
- scheduler → continuous batching
- kv_cache_config /
_initialize_kv_caches→ paged attention 메모리 풀 - request_block_hasher → prefix caching
- use_spec_decode → speculative decoding
- batch_queue / step_with_batch_queue → pipeline parallelism
1회차에서는 “이 다섯이 EngineCore 안에 다 모여있다” 는 것만 인지하면 충분. 각각의 디테일은 다음 회차에서 한 줄씩 풀어간다.
⑦ 전체 흐름 요약 (call chain)
# 사용자 코드
LLM(model=...)                                  ─┐
                                                 │
# entrypoints/llm.py:212                         │
LLM.__init__                                     │
  └─ EngineArgs(...)                             │
  └─ LLMEngine.from_engine_args(engine_args)     │
                                                 │
# v1/engine/llm_engine.py:152                    │ "엔진을 만든다"
LLMEngine.from_engine_args                       │
  └─ engine_args.create_engine_config()          │
  └─ Executor.get_class(vllm_config)             │
  └─ LLMEngine(vllm_config, ...)                 │
                                                 │
# v1/engine/llm_engine.py:50                     │
LLMEngine.__init__                               │
  ├─ renderer / input_processor / output_processor
  └─ EngineCoreClient.make_client(...)           │
       └─ InprocClient(...) ─┐                   │
                              ▼                  │
# v1/engine/core.py:91                           │
       EngineCore.__init__                       │
         ├─ model_executor (Executor)            │
         ├─ _initialize_kv_caches()              │
         ├─ Scheduler(...)                       │
         ├─ spec decode / prefix hash / batch_q  │
         └─ step_fn 결정                        ─┘

# 사용자 코드
llm.generate(prompts, sampling_params)           ─┐
  └─ LLM._validate_and_add_requests(...)         │
  └─ while llm_engine.has_unfinished_requests(): │ "generate 호출"
       step_outputs = llm_engine.step()          │
                                                 │
LLMEngine.step()                                 │
  └─ engine_core.get_output()                    │
  └─ output_processor.process_outputs(...)       │
  └─ engine_core.abort_requests(...)            ─┘
🧩 LLM Engine constructor — 엔진의 부속들
The main components of the engine are:
- vLLM config (contains all of the knobs for configuring model, cache, parallelism, etc.)
- processor (turns raw inputs → EngineCoreRequests via validation, tokenization, and processing)
- engine core client (in our running example we’re using InprocClient which is basically == EngineCore; we’ll gradually build up to DPLBAsyncMPClient which allows serving at scale)
- output processor (converts raw EngineCoreOutputs → RequestOutput that the user sees)
엔진의 주요 컴포넌트는 — (1) vLLM config (모델/캐시/병렬화 등 모든 설정 노브), (2) processor (raw 입력 → 검증·토크나이즈·전처리 → EngineCoreRequest), (3) engine core client (러닝 예제에선 InprocClient ≈ EngineCore, 이후 점진적으로 대규모 서빙용 DPLBAsyncMPClient까지 확장), (4) output processor (raw EngineCoreOutputs → 사용자에게 보이는 RequestOutput).
📝 V0가 deprecated 되면서 클래스 이름·시그니처는 계속 바뀌는 중. 중요한 건 정확한 이름이 아니라 core idea.
① 4대 컴포넌트 — 현재 코드 매핑
| 블로그 표현 | 현재 vllm 클래스 | 위치 |
|---|---|---|
vLLM config |
VllmConfig |
vllm/config/ |
processor |
InputProcessor (+ Renderer) |
v1/engine/input_processor.py |
engine core client |
InprocClient → SyncMPClient → AsyncMPClient → DPLBAsyncMPClient |
v1/engine/core_client.py |
output processor |
OutputProcessor |
v1/engine/output_processor.py |
② Engine Core 내부 — sub components
Engine core itself is made up of several sub components:
- Model Executor (drives forward passes; UniProcExecutor → MultiProcExecutor)
- Structured Output Manager (guided decoding)
- Scheduler (decides which requests go into the next engine step)
- policy: FCFS or priority
- waiting / running queues
- KV cache manager — heart of paged attention
| sub-component | 현재 vllm 위치 |
|---|---|
| Model Executor (UniProc) | v1/executor/uniproc_executor.py (라인 26: class UniProcExecutor) |
| Model Executor (MultiProc) | v1/executor/ |
| Structured Output Manager | v1/structured_output/ |
| Scheduler | v1/core/sched/scheduler.py (라인 67) |
| KV Cache Manager | v1/core/kv_cache_manager.py (라인 106) |
Block Pool / free_block_queue |
v1/core/block_pool.py (라인 130: class BlockPool, 라인 168: self.free_block_queue = FreeKVCacheBlockQueue(...)) |
Scheduler 내부를 실제 코드로 보면 policy / waiting / running 이 그대로 변수명에 박혀있다 — 글과 코드의 일대일 매핑.
# vllm/v1/core/sched/scheduler.py:67~170
class Scheduler(SchedulerInterface):
    def __init__(self, ...):
        ...
        self.max_num_running_reqs = self.scheduler_config.max_num_seqs

        # policy 에 따라 큐 구현이 달라짐 (FCFS deque / priority heap)
        self.waiting          = create_request_queue(self.policy)
        self.skipped_waiting  = create_request_queue(self.policy)  # async 의존/제약 때문에 스킵된 요청
        self.running: list[Request] = []
③ KV Cache Manager — free_block_queue 의 정체
The KV-cache manager maintains a
free_block_queue— a pool of available KV-cache blocks (often on the order of hundreds of thousands, depending on VRAM size and block size). During paged attention, the blocks serve as the indexing structure that map tokens to their computed KV cache blocks.
KV cache manager는 free_block_queue(가용 KV cache 블록 풀)를 들고 있다. VRAM 크기와 block size에 따라 수십만 단위까지 만들어진다. paged attention 동안 이 블록들이 “토큰 → 계산된 KV cache 블록” 으로 매핑하는 indexing structure 역할을 한다.


그림 해석: 위쪽 에 engine core client → engine core(model executor / scheduler / SOM) → output processor의 흐름, 중간 에 CPU상의 block_pool 인덱스 구조, 아래 에 GPU상의 paged KV cache memory 블록들. 인덱스(CPU)와 실제 메모리(GPU)의 분리가 paged attention의 핵심이다.
④ 표준 트랜스포머의 block size 공식
Block size for a standard transformer layer (non-MLA) is computed as follows:
2 (key/value) * block_size (default=16) * num_kv_heads * head_size * dtype_num_bytes (e.g. 2 for bf16)
- 2 = K, V 둘 다 저장
- block_size = 16 = 한 블록에 토큰 16개분 KV가 들어감 (vLLM 디폴트)
- num_kv_heads × head_size = GQA에서 group된 KV head 차원
- dtype_num_bytes = bf16/fp16이면 2, fp8이면 1
예) Llama-3-8B, bf16, num_kv_heads=8, head_size=128, num_layers=32 → 레이어당 한 블록 = 2 · 16 · 8 · 128 · 2 = 65,536 B = 64 KiB. 32 레이어면 한 블록(=토큰 16개) 당 2 MiB. 80 GiB GPU면 단순 계산으로 block 수가 수만~수십만 개 단위 — 그림의 “수십만”의 근거.
⑤ Model Executor 내부 — Worker의 3대 절차
During model executor construction, a Worker object is created, and three key procedures are executed.
Model Executor를 만들 때 Worker 객체가 생성되고 3대 절차가 실행된다. 이후 MultiProcExecutor가 들어오면 이 같은 절차가 GPU별 worker 프로세스에서 각각 독립적으로 돈다.
코드: vllm/v1/worker/gpu_worker.py — class Worker @ 라인 105.
(1) init_device — 라인 219
- CUDA device 할당 (예:
"cuda:0") + 모델 dtype 지원 여부 검증 (bf16 등) - 요청한
gpu_memory_utilization(예: 0.8 → VRAM 80%) 만큼 메모리 잡을 수 있는지 확인 - 분산 설정 셋업 (DP / TP / PP / EP …)
model_runner인스턴스화 — sampler, KV cache, forward용 버퍼(input_ids, positions 등) 보유InputBatch인스턴스화 — CPU 측 forward 버퍼, KV cache indexing용 block table, sampling metadata 등
관련 클래스: GPUModelRunner (라인 394) · InputBatch (라인 81)
(2) load_model — 라인 318
- 모델 아키텍처 인스턴스화
- 모델 weight 로드
model.eval()호출 (PyTorch inference 모드)- Optional:
torch.compile()호출
(3) Initialize KV cache — determine_available_memory + compile_or_warm_up_model
- 레이어별 KV cache spec 얻기. 과거엔 항상
FullAttentionSpec(homogeneous transformer)이었는데, hybrid model(sliding window, Transformer/SSM Jamba 등)이 등장하면서 복잡해짐 — Jenga 논문 참고. kv_cache_interface.py:164class FullAttentionSpec - dummy / profiling forward pass 를 한 번 돌리고 GPU 메모리 스냅샷 → 가용 VRAM 안에 KV cache 블록 몇 개가 들어가는지 계산. gpu_worker.py:332
determine_available_memory - KV cache 텐서 allocate / reshape / attention 레이어에 bind
- attention metadata 준비 (예: backend = FlashAttention) — 추후 forward 중 커널이 소비
--enforce-eager가 아니면 warmup batch size 별로 dummy run하고 CUDA Graph 캡처. CUDA Graph는 GPU 작업 시퀀스를 DAG로 기록해 두고, 실제 forward에서 launch/replay만 하므로 kernel launch overhead를 잘라내고 latency를 줄임. gpu_worker.py:552compile_or_warm_up_model
🎯 요약: Worker init은 결국 “GPU 잡기 → 모델 로드 → KV cache 풀 잡고 CUDA Graph 캡처” 의 3 step. 가용 VRAM 측정 → 블록 수 결정 이 paged attention 메모리 계획의 핵심 포인트.
Now that we have the engine initialized let’s proceed to the generate function.
여기까지가 엔진 생성자(constructor) 분석. 다음 단계는 generate() 함수.
⚙️ Generate function — 요청 주입과 step 루프
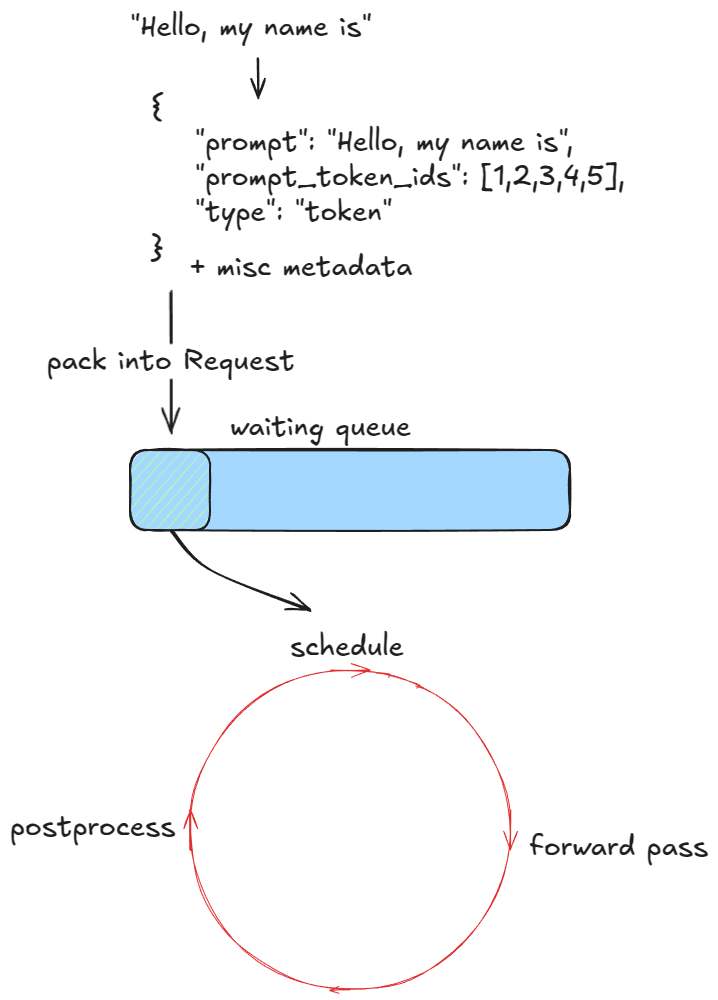
The first step is to validate and feed requests into the engine. For each prompt we:
- Create a unique request ID and capture its arrival time
- Call an input preprocessor that tokenizes the prompt and returns a dictionary containing prompt, prompt_token_ids, and a type (text, tokens, embeds, etc.)
- Pack this info into an EngineCoreRequest, adding priority, sampling params, and other metadata
- Pass the request into the engine core, which wraps it in a Request object and sets its status to WAITING. This request is then added to the scheduler’s waiting queue (append if FCFS, or heap-push if priority)
첫 단계는 요청을 검증해서 엔진에 밀어 넣는 것. 각 prompt에 대해 — (1) 고유한 request ID 생성 + arrival time 기록, (2) input preprocessor가 토크나이즈해서 prompt, prompt_token_ids, type(text/tokens/embeds 등)을 dict로 반환, (3) 이 정보를 EngineCoreRequest로 묶고 priority·sampling params·메타 추가, (4) engine core로 전달 → Request 객체로 래핑되고 status가 WAITING으로 세팅됨. 이후 스케줄러의 waiting queue에 들어감 (FCFS면 append, priority면 heap-push).
① “요청 주입” — 코드로 따라가기
| 블로그의 4단계 | 현재 vllm 코드 위치 |
|---|---|
| ① 고유 request ID 부여 | entrypoints/llm.py:1815 LLM._add_request→ request_id = str(next(self.request_counter)) |
| ② input preprocessor 호출 | v1/engine/llm_engine.py:209 LLMEngine.add_request→ self.input_processor.process_inputs(...) |
③ EngineCoreRequest로 패킹 |
같은 process_inputs의 리턴값이 곧 EngineCoreRequest. 타입 정의: v1/engine/init.py |
| ④ engine core 전달 → Request 래핑 → status=WAITING → waiting queue | v1/engine/core.py:315 EngineCore.add_request → v1/request.py:91 self.status = RequestStatus.WAITING |
RequestStatus enum을 보면 단순한 WAITING 외에도 고급 기능용 세분화된 대기 상태가 있다. 시리즈 후반부의 떡밥.
# vllm/v1/request.py:299
class RequestStatus(enum.IntEnum):
    WAITING = enum.auto()
    WAITING_FOR_STRUCTURED_OUTPUT_GRAMMAR = enum.auto()  # guided decoding 대기
    WAITING_FOR_REMOTE_KVS = enum.auto()                 # disaggregated P/D에서 KV 전송 대기
    WAITING_FOR_STREAMING_REQ = enum.auto()
    # ... RUNNING / PREEMPTED / FINISHED_* ...
② Sync vs Async — 같은 step 루프, 다른 주입 시점
In the synchronous engine example, these initial prompts are the only ones we’ll process — there’s no mechanism to inject new requests mid-run. In contrast, the asynchronous engine supports this (aka continuous batching): after each step, both new and old requests are considered.
Because the forward pass flattens the batch into a single sequence and custom kernels handle it efficiently, continuous batching is fundamentally supported even in the synchronous engine.
동기 엔진 예제에서는 처음 던진 프롬프트들만 처리되고, 실행 중에 새 요청을 주입하는 메커니즘이 없다. 반면 비동기 엔진은 step마다 신·구 요청을 모두 고려할 수 있다 — 이게 continuous batching.
그런데 기본 메커니즘 자체는 동기 엔진도 동일하게 갖고 있다. forward pass가 batch를 단일 시퀀스로 flatten하고 커스텀 커널이 효율적으로 처리하기 때문에, “주입 시점”만 다를 뿐 batching 구조는 같다.
💡 continuous batching은 “새 요청을 도중에 끼워 넣을 수 있다” 의 문제이지, forward pass 자체가 다른 게 아니다. 동기 엔진의 forward 커널 = 비동기 엔진의 forward 커널. 차이는 스케줄러 입력에 어떤 요청이 들어오느냐 일 뿐.
③ step() 의 3단계
Next, as long as there are requests to process, the engine repeatedly calls its
step()function. Each step has three stages:
- Schedule: select which requests to run in this step (decode, and/or (chunked) prefill)
- Forward pass: run the model and sample tokens
- Postprocess: append sampled token IDs to each Request, detokenize, and check stop conditions. If a request is finished, clean up (e.g. return its KV-cache blocks to
free_block_queue) and return the output early
| step 단계 | 코드 위치 |
|---|---|
| Schedule | v1/core/sched/scheduler.py:351 Scheduler.schedule() — SchedulerOutput 반환 |
| Forward pass | v1/worker/gpu_model_runner.py GPUModelRunner.execute_model — Executor를 통해 호출 |
| Postprocess (token append + stop 체크 + 블록 반납) | v1/core/sched/scheduler.py:1302 update_from_output + v1/core/sched/utils.py:94 check_stop |
④ Stop 조건 — 정확히 무엇으로 끝나는가
Stop conditions are:
- The request exceeds its length limit (
max_model_lengthor its ownmax_tokens)- The sampled token is the EOS ID (unless
ignore_eosis enabled — useful for benchmarking when we want to force a generation of a certain number of out tokens)- The sampled token matches any of the
stop_token_idsspecified in the sampling parameters- Stop strings are present in the output — we truncate the output until the first stop string appearance and abort the request in the engine (note that
stop_token_idswill be present in the output but stop strings will not).
Stop 조건은 4가지 — (a) 길이 한계 초과 (max_model_length 또는 요청별 max_tokens), (b) 샘플된 토큰이 EOS ID (단, ignore_eos면 무시 — 벤치마크에서 특정 개수만큼 강제로 생성시킬 때 유용), (c) 샘플된 토큰이 sampling params의 stop_token_ids 중 하나와 일치, (d) 출력에 stop string 등장 — 첫 등장까지 truncate 후 엔진에서 abort. 참고: stop_token_ids는 출력에 포함 되지만 stop string은 제외 됨.
# vllm/v1/core/sched/utils.py:94
def check_stop(request: Request, max_model_len: int) -> bool:
    sampling_params = request.sampling_params

    if request.num_output_tokens < sampling_params.min_tokens:
        return False

    last_token_id = request.output_token_ids[-1]

    # (b) EOS
    if last_token_id == sampling_params.eos_token_id:
        request.status = RequestStatus.FINISHED_STOPPED
        return True

    # (c) stop_token_ids
    if last_token_id in (sampling_params.stop_token_ids or ()):
        request.status = RequestStatus.FINISHED_STOPPED
        request.stop_reason = last_token_id
        return True

    # (a) length cap (max_model_len OR per-request max_tokens)
    if (
        request.num_tokens >= max_model_len
        or request.num_output_tokens >= request.max_tokens
    ):
        request.status = RequestStatus.FINISHED_LENGTH_CAPPED
        return True
    ...
(a)(b)(c)는 토큰 단위라 위 코드에서 처리하지만, (d) stop string은 detokenize된 텍스트 매칭이라 별도 경로 — v1/engine/detokenizer.py:304 check_stop_strings.
⑤ 한 사이클의 데이터 흐름 (요청 주입 → step 반복)

Schedule → Forward pass → Postprocess의 3단계가 끝없이 반복되는 구조. 각 step이 끝날 때마다 finish 여부 체크 → KV blocks 반납 → output 반환 이 일어난다.
# 사용자 코드
llm.generate(prompts, sampling_params)
  └─ for prompt in prompts:
       LLM._add_request(prompt, params)            # entrypoints/llm.py:1815
         └─ request_id = str(next(self.request_counter))
         └─ LLMEngine.add_request(request_id, ...) # v1/engine/llm_engine.py:209
              └─ input_processor.process_inputs(...) ──┐
                                                       ▼
                                            EngineCoreRequest
              └─ engine_core.add_request(req)
                   └─ EngineCore.add_request()         # v1/engine/core.py:315
                        └─ request = Request.from_engine_core_request(...)
                        └─ request.status = WAITING    # v1/request.py:91
                        └─ scheduler.add_request(req)
                             └─ self.waiting.append(req)   # FCFS
                                or heappush(...)           # priority

  └─ while llm_engine.has_unfinished_requests():
       step_outputs = llm_engine.step()                # 반복

LLMEngine.step()
  └─ engine_core.get_output()
       └─ EngineCore.step()                            # v1/engine/core.py:402
            ① scheduler_output = self.scheduler.schedule()    # 무엇을 돌릴지 결정
            ② model_output     = self.model_executor.execute_model(scheduler_output)  # forward + sample
            ③ engine_core_output = self.scheduler.update_from_output(
                   scheduler_output, model_output)            # token append + stop 체크
                  └─ check_stop(request, max_model_len)       # utils.py:94
                  └─ if finished: free_block_queue 로 KV blocks 반납
  └─ output_processor.process_outputs(...)             # detokenize + stop string 체크
  └─ engine_core.abort_requests(reqs_to_abort)         # stop string으로 끝난 요청 abort
🎯 요약: generate()가 하는 일은 결국 “모든 prompt를 add_request로 waiting queue에 밀어 넣고, has_unfinished_requests 동안 step()을 반복”. step의 3단계(Schedule / Forward / Postprocess)는 V0/V1 어떤 엔진이든 동일한 골격.
Next, we’ll examine scheduling in more detail.
다음 단계는 스케줄링 의 디테일.
🗓️ Scheduler — prefill/decode와 allocate_slots
There are two main types of workloads an inference engine handles:
- Prefill requests — a forward pass over all prompt tokens. These are usually compute-bound (threshold depends on hardware and prompt length). At the end, we sample a single token from the probability distribution of the final token’s position.
- Decode requests — a forward pass over just the most recent token. All earlier KV vectors are already cached. These are memory-bandwidth-bound, since we still need to load all LLM weights (and KV caches) just to compute one token.
추론 엔진이 다루는 워크로드는 크게 두 종류 — (a) Prefill: prompt 토큰 전체를 한 번에 forward. 보통 compute-bound (정확한 임계는 하드웨어/길이에 따라 다름). 마지막 위치의 확률 분포에서 토큰 1개를 샘플링. (b) Decode: 가장 최근 토큰 하나에 대해서만 forward. 이전 KV는 캐시에 있음. 그러나 LLM weight(+ KV cache)는 여전히 다 메모리에서 로드해야 하므로 memory-bandwidth-bound.
💡 prefill = “GPU 연산 수가 많아서 SM이 바쁨”, decode = “weight를 메모리에서 읽어오느라 대역폭이 병목”. 같은 GPU라도 두 페이즈에서 보이는 효율 곡선이 완전히 다른 이유. roofline 분석은 시리즈 후반(Benchmarks 파트)의 떡밥.
① V1 vs V0 — prefill/decode 동시 처리
The V1 scheduler can mix both types of requests in the same step, thanks to smarter design choices. In contrast, the V0 engine could only process either prefill or decode at once.
V1 스케줄러는 같은 step 안에 prefill과 decode를 섞어서 돌릴 수 있다. V0는 한 step에 둘 중 하나만 가능했음.
# vllm/v1/core/sched/scheduler.py:351 schedule() 본문 첫 NOTE
def schedule(self) -> SchedulerOutput:
    # NOTE on the scheduling algorithm:
    # There's no "decoding phase" nor "prefill phase" in the scheduler.
    # Each request just has the num_computed_tokens and num_tokens_with_spec.
    # num_tokens_with_spec = len(prompt_token_ids) + len(output_token_ids) + len(spec_token_ids).
    # At each step, the scheduler tries to assign tokens to the requests
    # so that each request's num_computed_tokens can catch up its num_tokens_with_spec.
    # This is general enough to cover chunked prefills, prefix caching,
    # speculative decoding, and the "jump decoding" optimization in the future.
핵심: V1은 모든 요청을 “이미 계산한 토큰 수 vs 가야 할 토큰 수” 로만 본다. prefill/decode 구분이 데이터 모델 차원에서 사라졌고, 그 덕분에 chunked prefill / prefix caching / spec decoding이 같은 추상화 위에서 자연스럽게 동작.
② 스케줄링 순서 — running 먼저, 그다음 waiting
The scheduler prioritizes decode requests — i.e. those already in the running queue. For each such request it:
- Computes the number of new tokens to generate (not always 1, due to speculative decoding and async scheduling).
- Calls the KV-cache manager’s
allocate_slotsfunction.- Updates the token budget by subtracting the number of tokens from step 1.
After that, it processes prefill requests from the waiting queue, it:
- Retrieves the number of computed blocks (returns 0 if prefix caching is disabled).
- Calls the KV-cache manager’s
allocate_slotsfunction.- Pops the request from waiting and moves it to running, setting its status to
RUNNING.- Updates the token budget.
스케줄러는 우선 running queue (= 진행 중인 decode) 부터 처리. 각각에 대해 — (1) 이번 step에 생성할 새 토큰 수 계산 (spec decode/async scheduling 때문에 항상 1은 아님), (2) KV cache manager의 allocate_slots 호출, (3) 1번 만큼 token budget 차감.
그 후 waiting queue (= prefill 대기) 처리 — (a) 이미 계산된 블록 수 조회 (prefix caching 꺼져있으면 0), (b) allocate_slots 호출, (c) waiting → running 으로 이동시키고 status를 RUNNING으로, (d) token budget 갱신.
🎯 왜 running 먼저인가: 진행 중인 decode를 막으면 사용자 입장에서 inter-token latency(ITL)가 튄다. 그래서 한정된 token budget을 먼저 진행 중인 요청에 채워주고, 남는 만큼만 새 prefill을 받는 정책.
# vllm/v1/core/sched/scheduler.py:351~ schedule() 일부
token_budget = self.max_num_scheduled_tokens
...

self.kv_cache_manager.new_step_starts()

# First, schedule the RUNNING requests.
req_index = 0
while req_index < len(self.running) and token_budget > 0:
    request = self.running[req_index]
    ...
    num_new_tokens = (
        request.num_tokens_with_spec
        + request.num_output_placeholders
        - request.num_computed_tokens
    )
    # long_prefill_token_threshold 로 cap → chunked prefill의 기반
    if 0 < self.scheduler_config.long_prefill_token_threshold < num_new_tokens:
        num_new_tokens = self.scheduler_config.long_prefill_token_threshold
    num_new_tokens = min(num_new_tokens, token_budget)

    # max_model_len 도 체크 (spec decoding 때문)
    num_new_tokens = min(
        num_new_tokens, self.max_model_len - 1 - request.num_computed_tokens
    )
    ...
    # → 이 안에서 kv_cache_manager.allocate_slots(...) 호출
token_budget은 한 step에 처리할 수 있는 토큰 총량의 캡. long_prefill_token_threshold가 chunked prefill의 단위.
③ allocate_slots — KV cache 블록 잡기
Let’s now look at what
allocate_slotsdoes, it:
- Computes number of blocks — determines how many new KV-cache blocks (n) must be allocated. Each block stores 16 tokens by default. For example, if a prefill request has 17 new tokens, we need
ceil(17/16) = 2blocks.- Checks availability — if there aren’t enough blocks in the manager’s pool, exit early. Depending on whether it’s a decode or prefill request, the engine may attempt recompute preemption (swap preemption was supported in V0) by evicting low-priority requests (calling
kv_cache_manager.freewhich returns KV blocks to block pool), or it might skip scheduling and continue execution.- Allocates blocks — via the KV-cache manager’s coordinator, fetches the first n blocks from the block pool (the
free_block_queuedoubly linked list mentioned earlier). Stores toreq_to_blocks, the dictionary mapping eachrequest_idto its list of KV-cache blocks.
allocate_slots가 하는 일은 — (1) 블록 수 계산: 새로 할당할 KV cache 블록 개수 n. 블록당 기본 16 토큰. 예) 17개 새 토큰이면 ceil(17/16) = 2개. (2) 가용성 체크: 풀에 블록이 부족하면 early exit. decode/prefill 종류에 따라 엔진이 recompute preemption을 시도하거나(우선순위 낮은 요청을 evict해서 kv_cache_manager.free 호출 → 블록 반납), 스케줄을 건너뛰고 그대로 진행. V0에서는 swap preemption도 지원했었다. (3) 할당: KV cache manager의 coordinator가 block pool(아까 본 free_block_queue 이중 연결 리스트)에서 첫 n개를 꺼내서 req_to_blocks[request_id] = [...] 매핑에 저장.
| 단계 | 현재 vllm 위치 |
|---|---|
allocate_slots 본문 |
v1/core/kv_cache_manager.py:257 KVCacheManager.allocate_slots |
| computed blocks 조회 (prefix caching) | v1/core/kv_cache_manager.py:176 get_computed_blocks |
| 블록 반납 (preemption / 종료) | v1/core/kv_cache_manager.py:429 free |
| 실제 풀에서 블록 꺼내기 | v1/core/block_pool.py:336 self.free_block_queue.popleft_n(num_blocks) |
코드 docstring이 보여주는 블록 레이아웃 (블로그에서 빠진 디테일):
Blocks layout:
----------------------------------------------------------------------
| < comp > | < new_comp > | < ext_comp > | < new > | < lookahead > |
----------------------------------------------------------------------
                                          |   < to be computed >    |
----------------------------------------------------------------------
                          |            < to be allocated >          |
----------------------------------------------------------------------
                          | < to be cached (roughly) >              |
----------------------------------------------------------------------
| Prefix-cached tokens from either vLLM   |
| or connector. Can be safely removed if  |
| they are outside sliding window.        |
----------------------------------------------------------------------
| < cached by vLLM >       | not cached by vLLM, but cached         |
                           | by external connector (P/D, etc.)      |
----------------------------------------------------------------------
한 요청의 토큰을 5개 영역으로 분류: comp(이전 step에서 계산 완료) / new_comp(이번 step prefix-caching 히트) / ext_comp(P/D connector가 외부에서 가져온 KV) / new(이번 step에 진짜 계산할 것) / lookahead(spec decoding draft 토큰용 예약). 블로그는 (1)(2)(3)만 다뤘지만, 코드는 이 5개 영역을 동시에 관리.
④ 그림 — KV cache 블록과 토큰의 매핑


각 요청의 토큰 시퀀스가 16 토큰 단위 블록 으로 나뉘고, 각 블록이 GPU상의 paged KV cache 메모리 슬롯으로 매핑되는 구조. req_to_blocks 딕셔너리가 “request_id → 블록 리스트” 매핑을 들고 있음.
We’re finally ready to do a forward pass!
이제 드디어 forward pass를 돌릴 준비 완료.
🚀 Forward pass — execute_model의 5단계
We call model executor’s
execute_model, which delegates to the Worker, which in turn delegates to the model runner.
Model Executor의 execute_model을 호출 → Worker로 위임 → 다시 ModelRunner로 위임. 같은 메서드 이름을 한 단계씩 내려가는 구조.
① 호출 체인 — Executor → Worker → ModelRunner
| 단계 | 현재 vllm 위치 |
|---|---|
| Executor.execute_model | v1/executor/uniproc_executor.py:102 |
| Worker.execute_model | v1/worker/gpu_worker.py:753 |
| GPUModelRunner._update_states / _prepare_inputs / _sample | v1/worker/gpu_model_runner.py:1061 / 1776 / 3329 |
② 5단계의 의미
Here are the main steps:
- Update states — prune finished requests from
input_batch; update misc fwd-pass related metadata (e.g., KV cache blocks per request that will be used to index into paged KV cache memory).- Prepare inputs — copy buffers from CPU→GPU; compute positions; build
slot_mapping(more on that in example); construct attention metadata.- Forward pass — run the model with custom paged attn kernels. All sequences are flattened and concatenated into one long “super sequence”. Position indices and attention masks ensure each sequence only attends to its own tokens, which enables continuous batching without right-padding.
- Gather last-token states — extract hidden states for each sequence’s final position and compute logits.
- Sample — sample tokens from computed logits as dictated by the sampling config (greedy, temperature, top-p, top-k, etc.).
5단계 — (1) Update states: input_batch에서 끝난 요청 제거, paged KV cache 메모리 인덱싱에 쓸 “요청별 KV 블록” 등 메타 갱신. (2) Prepare inputs: CPU→GPU 버퍼 복사, position 계산, slot_mapping 빌드, attention metadata 구성. (3) Forward pass: paged attention 커스텀 커널로 모델 실행. 모든 시퀀스를 flatten해서 하나의 긴 “super sequence”로 concat 하고, position index와 attention mask로 각 시퀀스가 자기 토큰만 attend하게 함 → right-padding 없이 continuous batching 가능. (4) Gather last-token states: 시퀀스별 마지막 위치의 hidden state 추출 + logits 계산. (5) Sample: sampling config(greedy / temperature / top-p / top-k 등)에 따라 토큰 샘플.
③ 단계별 코드 매핑
| 단계 | 현재 vllm 위치 / 핵심 함수 |
|---|---|
| ① Update states | GPUModelRunner._update_states @ 1061 + _update_states_after_model_execute @ 1416 |
| ② Prepare inputs | _prepare_inputs @ 1776 + input_batch.block_table.compute_slot_mapping(...) @ 1997 |
| ③ Forward pass (paged attn) | v1/attention/ + 모델 정의 (vllm/model_executor/) |
| ④ Gather last-token / logits | 모델의 LM head + sampler 진입 직전 hidden state 슬라이싱 (model_runner 내부) |
| ⑤ Sample | GPUModelRunner._sample @ 3329 + v1/sample/ |
💡
slot_mapping이란? “이번 step에 forward 할 각 토큰을 paged KV cache의 어느 슬롯(블록 ID × 블록 내 오프셋)에 써야 하는가”를 알려주는 1D 텐서. attention 커널이 “K, V를 어디다 쓰고 어디서 읽어야 하는지” 를 매 step 다시 알려줘야 하기 때문에 prepare 단계에서 새로 만들어진다. 코드: gpu_model_runner.py:1997compute_slot_mapping.
④ Eager vs Captured (CUDA Graph)
Forward-pass step itself has two execution modes:
- Eager mode — run the standard PyTorch forward pass when eager execution is enabled.
- “Captured” mode — execute/replay a pre-captured CUDA Graph when eager is not enforced (remember we captured these during engine construction in the initialize KV cache procedure).
Forward pass에는 두 실행 모드가 있다 — (a) Eager: 평범한 PyTorch forward(--enforce-eager 켜진 경우). (b) Captured: 엔진 생성 때 미리 캡처해 둔 CUDA Graph를 replay만 함 (앞에서 본 compile_or_warm_up_model 단계에서 캡처).
# vllm/v1/worker/gpu_model_runner.py 일부
from vllm.compilation.cuda_graph import CUDAGraphStat, CUDAGraphWrapper
from vllm.v1.cudagraph_dispatcher import CudagraphDispatcher

# self.cudagraph_batch_sizes sorts in ascending order.
if (
    self.compilation_config.cudagraph_capture_sizes
    and self.compilation_config.cudagraph_mode != CUDAGraphMode.NONE
):
    self.cudagraph_batch_sizes = sorted(
        self.compilation_config.cudagraph_capture_sizes
    )

# Cudagraph dispatcher for runtime cudagraph dispatching.
self.cudagraph_dispatcher = CudagraphDispatcher(self.vllm_config)
한 가지 그래프만 캡처하는 게 아니라 여러 batch size 별로 미리 캡처 해 두고, 매 step의 실제 batch size에 맞는 그래프를 dispatcher가 선택. 이게 vLLM이 dynamic batch에서도 CUDA Graph 이득을 그대로 뽑아내는 방법.
⑤ 그림 — flatten된 super sequence와 paged KV

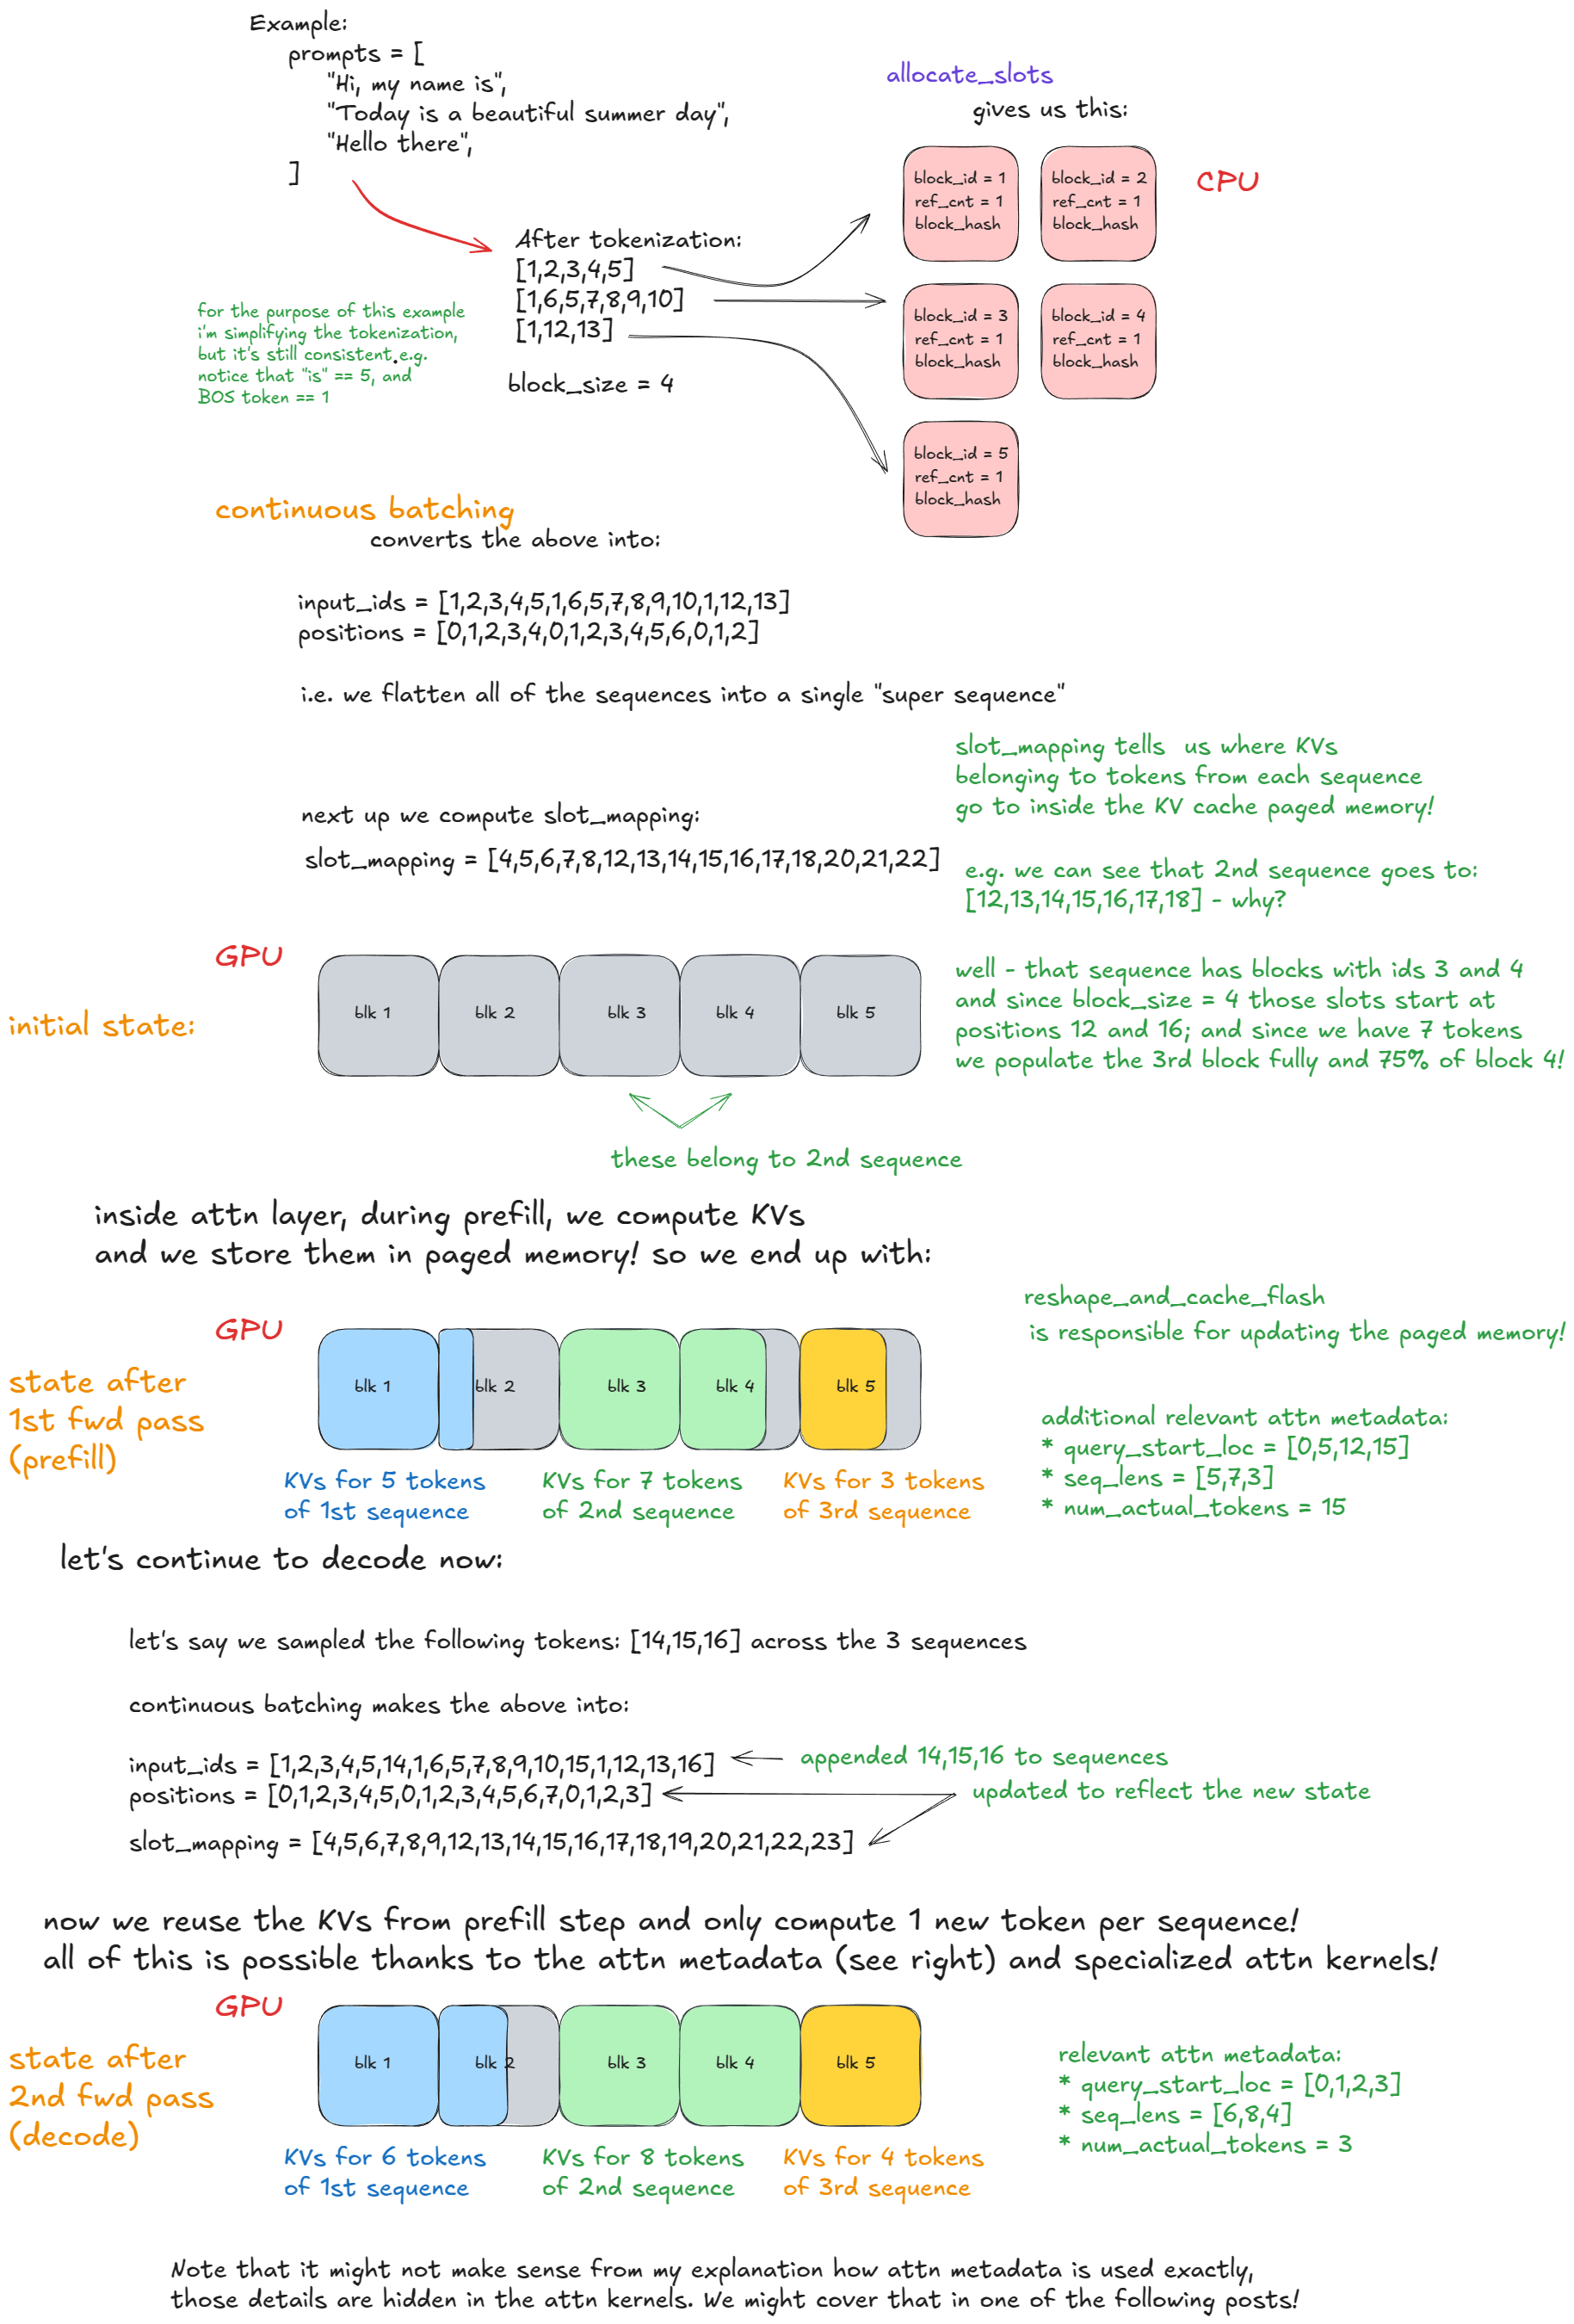
그림은 (위) 여러 요청의 토큰들이 단일 시퀀스로 concat되는 모습, (중간) slot_mapping으로 각 토큰이 paged KV의 어느 블록·오프셋에 쓰일지를 가리키는 모습, (아래) attention 커널이 같은 K/V 블록 풀을 공유하면서도 시퀀스 경계를 mask로 분리해 각자에게만 attend하는 모습을 한 장에 보여준다. right-padding 없이 batch 효율을 챙긴다는 vLLM의 핵심 트릭이 시각화된 그림.
🏁 챕터 1 마무리
여기까지가 챕터 1: LLM Engine & Engine Core 의 끝. 6줄짜리 offline inference 예제(LLM(...) + llm.generate(...)) 한 번 호출이 실제로는 어떤 컴포넌트들의 협주인지를 따라왔다.
✅ 챕터 1에서 짚은 것들
- 도입부 & 분석 기준 — 시리즈 5파트 구성, V1 엔진 / 단일 프로세스 / 단일 GPU / 표준 트랜스포머라는 단순화 사다리, 코드 매핑 표
- LLM 클래스 & LLMEngine —
LLM은EngineArgs빌더의 얇은 wrapper. 실제 엔진 본체는LLMEngine이고, 그 4대 컴포넌트는renderer·input_processor·engine_core·output_processor - EngineCore 내부 —
VllmConfig, Model Executor, Scheduler, KV Cache Manager(+BlockPool/free_block_queue), Structured Output Manager - Worker 3대 절차 —
init_device/load_model/determine_available_memory+compile_or_warm_up_model. “GPU 잡기 → 모델 로드 → 가용 VRAM 측정 후 KV cache 풀 잡고 CUDA Graph 캡처” - Generate 함수 —
add_request로 waiting queue에 밀어 넣고,has_unfinished_requests동안step()의 3단계(Schedule / Forward / Postprocess)를 반복. stop 조건은 길이 / EOS /stop_token_ids/ stop string의 4가지 - Scheduler — V1은 prefill/decode 구분이 데이터 모델 차원에서 사라짐 (“there’s no decoding phase nor prefill phase”). running 우선 → waiting 처리,
allocate_slots로 KV 블록 할당, 부족하면 recompute preemption - Forward pass — Executor → Worker → ModelRunner의 5단계. 모든 시퀀스를 단일 super sequence로 flatten + position/mask로 분리 → right-padding 없이 continuous batching 이 가능한 이유. Eager vs Captured(CUDA Graph) 두 모드
🧠 한 줄로 요약하면
vLLM은 결국 “GPU 메모리를 16-토큰짜리 페이지(블록)로 잘게 나눠 풀로 관리하고, 매 step마다 스케줄러가 그 풀에서 블록을 빌려 요청들에 분배하면서, 모든 요청을 하나의 긴 시퀀스로 flatten해 한 번의 forward pass에 욱여넣는” 시스템. 이게 페이지드 어텐션 + 컨티뉴어스 배칭이 협력해서 만드는 throughput의 정체.
📌 챕터 2 예고 — Advanced features
- 같은 시리즈의 Advanced features 파트로 진입. 다룰 주제: chunked prefill, prefix caching, guided / speculative decoding, disaggregated P/D
- 주요 코드 영역: kv_cache_manager.py의
get_computed_blocks, kv_cache_utils.py의 hash 함수, v1/spec_decode/, v1/structured_output/ - 학습 목표는 챕터 2 글에서 다시 정리. 챕터 1의
allocate_slots5영역 (comp / new_comp / ext_comp / new / lookahead)이 거기서 본격적으로 풀린다
원문: aleksagordic.com/blog/vllm
분석 기준: vllm-project/vllm mainc0879d948
댓글남기기